If you’ve been scrolling through craft videos lately, you’ve probably seen tiny, sparkling resin «diamonds» being placed one by one onto a canvas to reveal a glittering picture. That hobby is called diamond painting, and the easiest way to start is by buying a ready-made diamond art kit. In this guide we’ll cover what’s inside a kit, what to look for when buying one, and how to finish your first project without frustration.
What Is a Diamond Art Kit?
A diamond art kit (sometimes called a diamond painting kit, 5D diamond painting, or diamond dotz set) is a complete craft package that lets you create a sparkling, mosaic-style picture by placing thousands of tiny faceted resin «drills» onto a sticky, pre-printed canvas. Each color on the canvas matches a numbered symbol, much like paint-by-numbers — only instead of paint, you use shimmering diamonds.
The result is a vibrant, textured artwork that catches the light from every angle. Most crafters find the process meditative and surprisingly addictive, which is why diamond painting has exploded in popularity among adults looking for a screen-free way to relax.
What’s Inside a Typical Diamond Art Kit
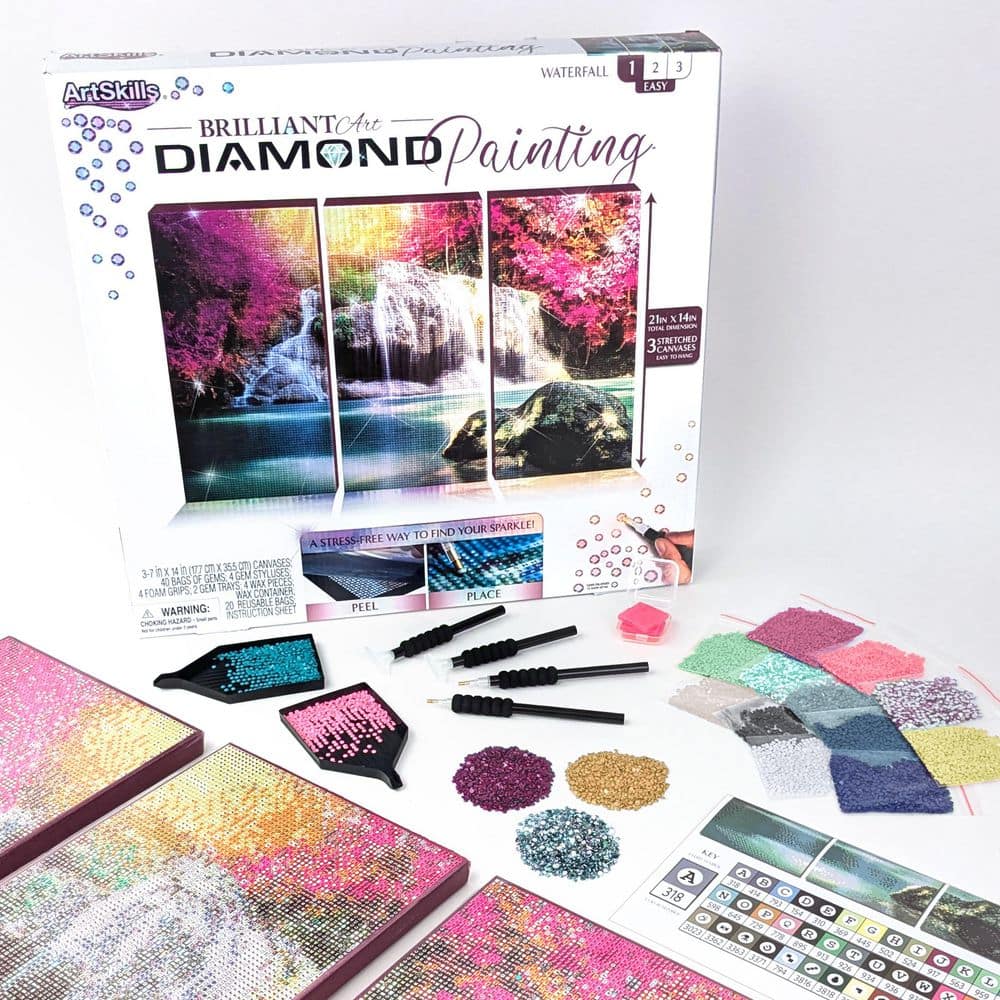
While brands vary slightly, almost every diamond art kit ships with the same core components:
- Pre-printed adhesive canvas — a high-resolution image covered with a sticky layer and a protective plastic film. Each tiny square is marked with a symbol that corresponds to a specific diamond color.
- Resin diamonds (drills) — small faceted beads sorted by color and labeled with the same symbols used on the canvas.
- Applicator pen (stylus) — a pen-like tool with a hollow tip that picks up one diamond at a time.
- Wax pad — a small block of pink or clear wax that helps the pen grip the diamonds.
- Sorting tray — a grooved plastic tray that aligns the diamonds flat-side down so the pen can pick them up easily.
- Color/symbol chart — a legend mapping each symbol on the canvas to a specific drill color (often labeled by DMC code).
Higher-end kits may also include extra diamonds in case you lose some, zip-top bags or storage containers, a multi-placer tip (for placing several diamonds at once), and a rolling tool to press finished sections flat.

Round vs. Square Drills: What’s the Difference?
One of the first decisions you’ll make is choosing between round and square drills. Both produce beautiful results, but they feel different to work with.
- Round drills are easier and faster to place. They’re forgiving of slight misalignment and ideal for beginners, kids, or anyone who wants a relaxing experience. The downside: small gaps between diamonds create a slightly less «complete» mosaic look.
- Square drills snap together with no visible gaps, producing a sharper, more polished image. They take more patience to align but are favored by experienced crafters who want a crisp finish.
Full Drill vs. Partial Drill
Another important spec to check before buying:
- Full drill — the entire canvas is covered in diamonds, edge to edge. Most rewarding visually, but takes longer to complete.
- Partial drill — only the main subject is covered in diamonds, while the background remains printed. Faster to finish and great if you want quick results.
For your very first project, a small full-drill kit (about 20×30 cm) is usually the sweet spot — large enough to feel satisfying, small enough to actually finish.
How to Choose Your First Diamond Art Kit
With thousands of designs available, it’s easy to feel overwhelmed. Use this short checklist to narrow it down:
- Pick a theme you genuinely love. You’ll be staring at this image for hours. Animals, landscapes, mandalas, and pop-culture portraits are popular starting points.
- Start small. Anything between 20×20 cm and 30×40 cm is manageable for a first project. Save the giant 80×120 cm masterpieces for once you’re hooked.
- Choose round drills for speed and ease, square for a polished look.
- Check the color count. Designs with 15–25 colors give beautiful detail without becoming a sorting nightmare.
- Look for sealed, poured-glue canvases. Cheap kits can have weak adhesive that releases diamonds over time. Read reviews before buying.
- Verify the kit is «5D» — meaning each diamond has multiple facets that catch the light from different angles.
Step-by-Step: How to Use a Diamond Art Kit
- Set up your workspace. Choose a flat, well-lit surface. A daylight lamp or LED light pad makes the symbols much easier to read.
- Unroll the canvas and flatten it. If it’s curled, place a few books on top for a few hours, or iron the back gently on a low setting with a cloth between.
- Sort your diamonds. Pour each color into a labeled bag or compartment in a storage box. This saves enormous time later.
- Read the legend. Match a symbol on the canvas to its color code, then pour a small amount of that color into the grooved tray and shake gently so the flat sides face down.
- Prime the pen. Dip the hollow tip lightly into the wax pad.
- Peel back a small section of the protective film — about the size of a postcard. Working in small sections keeps the adhesive fresh and dust-free.
- Press the pen onto a diamond, then place it on the matching symbol on the canvas. It will stick to the adhesive on contact.
- Work color by color or row by row. Most crafters prefer finishing one color across the section before moving to the next.
- Press finished areas flat with a rolling pin or a book wrapped in a cloth to make sure every diamond is secure.

Tips and Tricks for a Smoother Experience
- Work in good light. A bright lamp or a tracing light pad placed under the canvas dramatically improves visibility — especially for dark colors.
- Use tweezers for fixes. When a diamond lands slightly off, lift it with tweezers rather than scraping with the pen tip.
- Keep the protective film on over the areas you’re not working on. This prevents pet hair, dust, and lint from sticking to the adhesive.
- Don’t refresh the wax too often. A little goes a long way; too much makes diamonds stick to the pen and refuse to release.
- Take breaks. Diamond painting is relaxing, but it can strain your neck and eyes. Stand up every 30–45 minutes.
- Save leftover diamonds. Even 10–20 spare drills per color can rescue a lost piece months down the line.
Finishing and Framing Your Diamond Art
Once the last diamond is placed, you’ll want to preserve all that hard work. Here’s how to finish like a pro:
- Press the whole canvas flat with a rolling pin or wrapped book to secure every diamond.
- Optionally seal the surface with a brush-on diamond painting sealer. This locks the drills in place and adds a protective layer, although many crafters skip this step to preserve the natural sparkle.
- Mount on foam board using double-sided tape or spray adhesive to keep the canvas perfectly flat.
- Frame without glass. Glass dulls the sparkle. A simple shadow box or open frame with a wide rebate shows the diamonds off beautifully.
Storing Unfinished Projects
Most projects take more than one sitting. Between sessions:
- Roll the canvas with the diamonds facing outward — never inward, or finished sections may pop off.
- Better yet, store the canvas flat between two pieces of cardboard.
- Keep sorted diamonds in labeled zip bags or a screw-top bead organizer.
- Store everything away from direct sunlight, which can yellow the adhesive over time.
Diamond Art Kits — Frequently Asked Questions
How long does a diamond art kit take to complete?
A 20×30 cm full-drill kit usually takes 8–15 hours. A 40×50 cm kit can take 30–50 hours. Larger pieces or projects with more colors take significantly longer.
Are diamond art kits suitable for kids?
Yes, but choose a kit labeled for children (usually with larger drills and simpler designs) and supervise younger children, since the tiny diamonds are a choking hazard for kids under three.
What’s the difference between diamond art and cross stitch?
Both are grid-based crafts that produce a final picture, but cross stitch uses thread and needle on aida fabric, while diamond art uses resin drills on adhesive canvas. Diamond art is generally faster and easier for beginners.
Can I make my own custom diamond art kit?
Yes. Many online retailers convert your photo into a custom diamond painting kit, complete with sorted drills and a numbered canvas. Quality varies, so check reviews and order a smaller size first.
Do diamond paintings lose their sparkle over time?
Properly stored and sealed, diamond art keeps its sparkle for years. Avoid direct sunlight and dust by framing your finished piece.
Final Thoughts
A diamond art kit is one of the most beginner-friendly crafts you can pick up today: everything you need comes in the box, the learning curve is gentle, and the finished piece is genuinely impressive. Whether you want a calming evening hobby, a screen-free way to unwind, or a sparkling piece of art for your wall, starting with a small full-drill round-diamond kit is the easiest path in. Pick a design you love, set up a comfortable workspace, and enjoy the slow, satisfying magic of watching thousands of tiny diamonds turn into a finished picture.